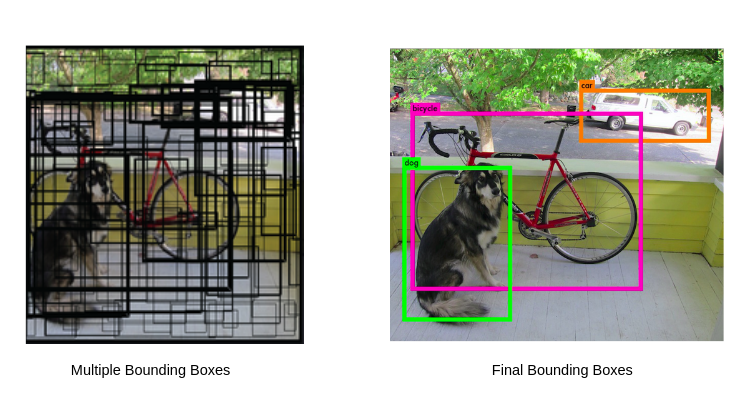
 Hình 1: Trước NMS (trái) vs Sau NMS (phải)
2024-03-23 · Object Detection, Post-processing
Xin chào các bạn! Trong bài viết này, mình sẽ hướng dẫn chi tiết về giải thuật Non-Maximum Suppression (NMS) - một kỹ thuật quan trọng trong khâu post-processing của các mô hình YOLO. Đây là kiến thức bắt buộc khi bạn muốn deploy YOLO model lên production.
Nếu bạn đã từng sử dụng thư viện Ultralytics để chạy YOLOv8, YOLOv5, output mà bạn nhận được thường ở định dạng đã được xử lý sẵn:
x_center, y_center, width, height, class, confidence_score
Tuy nhiên, đây là output đã được hậu xử lý. Khi bạn convert model sang các format khác như:
Thì output thô của model sẽ có dạng:
Shape: (1, 84, 8400) hoặc (1, 8400, 84)
Trong đó:
4 tọa độ + 80 classes (với COCO dataset)Khi deploy trên các nền tảng khác nhau:
| Platform | Ngôn Ngữ | Cần Implement NMS |
|---|---|---|
| Web | JavaScript | ✅ Có |
| Mobile (Android) | Java/Kotlin | ✅ Có |
| Mobile (iOS) | Swift | ✅ Có |
| Embedded | C++ | ✅ Có |
| Edge Devices | C/C++ | ✅ Có |
Khâu hậu xử lý (post-processing) của tác giả viết bằng Python sẽ KHÔNG được đính kèm sau khi convert. Điều này buộc bạn phải tự implement lại NMS.
Hình 1: Trước NMS (trái) vs Sau NMS (phải)
NMS loại bỏ các bounding boxes trùng lặp và chỉ giữ lại những boxes tốt nhất cho mỗi object.
Ví dụ: Khi detect một con chó, model có thể tạo ra 50-100 boxes cho cùng 1 object. NMS sẽ chọn box tốt nhất và loại bỏ các boxes còn lại.
IoU là nền tảng của thuật toán NMS. Đây là metric đo độ trùng lặp giữa 2 bounding boxes.
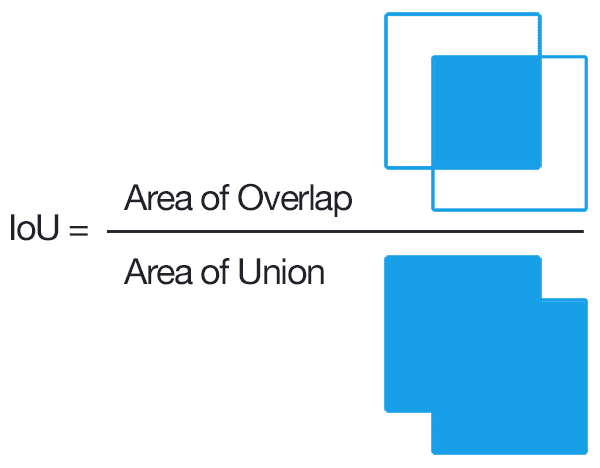 Hình 2: Công thức tính IoU
IoU = Area of Intersection / Area of Union
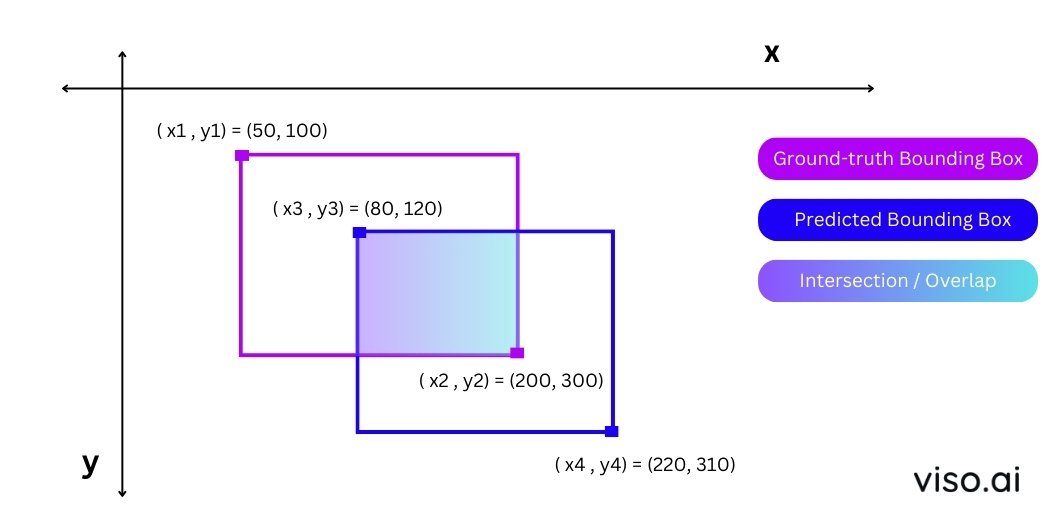 Hình 3: Ví dụ minh họa tính IoU
Cho 2 boxes:
Bước 1: Tính tọa độ phần giao (Intersection)
x_left = max(50, 80) = 80
y_top = max(100, 120) = 120
x_right = min(200, 220) = 200
y_bottom = min(300, 310) = 300
Bước 2: Tính diện tích giao
intersection_width = 200 - 80 = 120
intersection_height = 300 - 120 = 180
intersection_area = 120 × 180 = 21,600
Bước 3: Tính diện tích hợp
box1_area = (200 - 50) × (300 - 100) = 150 × 200 = 30,000
box2_area = (220 - 80) × (310 - 120) = 140 × 190 = 26,600
union_area = box1_area + box2_area - intersection_area
union_area = 30,000 + 26,600 - 21,600 = 35,000
Bước 4: Tính IoU
IoU = 21,600 / 35,000 = 0.617 (≈ 61.7%)
def calculate_iou(box1, box2):
    """
    Tính IoU giữa 2 bounding boxes

    Args:
        box1: [x1, y1, x2, y2] - tọa độ góc trái trên và phải dưới
        box2: [x1, y1, x2, y2]

    Returns:
        iou: float - giá trị IoU từ 0 đến 1
    """
    # Tìm tọa độ vùng giao
    x_left = max(box1[0], box2[0])
    y_top = max(box1[1], box2[1])
    x_right = min(box1[2], box2[2])
    y_bottom = min(box1[3], box2[3])

    # Kiểm tra có giao không
    if x_right < x_left or y_bottom < y_top:
        return 0.0

    # Tính diện tích giao
    intersection_area = (x_right - x_left) * (y_bottom - y_top)

    # Tính diện tích mỗi box
    box1_area = (box1[2] - box1[0]) * (box1[3] - box1[1])
    box2_area = (box2[2] - box2[0]) * (box2[3] - box2[1])

    # Tính diện tích hợp
    union_area = box1_area + box2_area - intersection_area

    # Tính IoU
    iou = intersection_area / union_area if union_area > 0 else 0

    return iou

# Test function
box1 = [50, 100, 200, 300]
box2 = [80, 120, 220, 310]
print(f"IoU = {calculate_iou(box1, box2):.4f}")  # Output: IoU = 0.6171
| IoU Value | Ý Nghĩa | Quyết Định NMS |
|---|---|---|
| 0.0 - 0.3 | Không trùng hoặc trùng ít | ✅ Giữ cả 2 boxes |
| 0.3 - 0.5 | Trùng vừa phải | ⚠️ Tùy threshold |
| 0.5 - 0.7 | Trùng nhiều | ❌ Loại box có conf thấp |
| 0.7 - 1.0 | Trùng rất nhiều | ❌ Chắc chắn loại |
Recommended IoU thresholds:
Input: 8400 predictions (mỗi prediction có 84 giá trị)
       ↓
[Step 1] Filter by Confidence Threshold
       ↓ (giữ lại ~100-500 boxes)
[Step 2] Extract Class & Confidence
       ↓
[Step 3] Group by Class
       ↓
[Step 4] Apply NMS per Class
       ↓
[Step 5] Combine Results
       ↓
Output: Final detections (x, y, w, h, class, conf)
Input format: Mỗi detection có dạng vector 84 giá trị:
[x_center, y_center, width, height, score_class0, score_class1, ..., score_class79]
 ↑________bbox coords_______↑  ↑____________80 class scores_________________↑
Ví dụ minh họa:
Giả sử detection vector:
detection = [0.5, 0.3, 0.2, 0.15,  # bbox: x, y, w, h
             0.02, 0.91, 0.05, ..., 0.01]  # 80 class scores
Với conf_threshold = 0.5:
max_score = max(detection[4:]) = 0.91  # score của class 1 (person)
if max_score > 0.5:
    keep_this_detection = True  # ✅ GIỮ LẠI
else:
    discard_detection = True    # ❌ LOẠI BỎ
Tại sao các scores không tổng = 1?
YOLO sử dụng Sigmoid activation cho mỗi class (không phải Softmax):
sigmoid(x) ∈ [0, 1]Ví dụ: Một object có thể vừa là "person" (0.9) vừa là "tennis racket" (0.8)
# Trước Step 2
detection = [0.5, 0.3, 0.2, 0.15, 0.02, 0.91, 0.05, ..., 0.01]

# Sau Step 2
class_id = argmax([0.02, 0.91, 0.05, ..., 0.01]) = 1  # class "person"
max_conf = max([0.02, 0.91, 0.05, ..., 0.01]) = 0.91

# Output format mới
processed_detection = [0.5, 0.3, 0.2, 0.15, 1, 0.91]
#                      ↑___bbox coords___↑  ↑cls↑conf
Note: Trong thực tế, Step 1 và Step 2 được thực hiện cùng lúc để tối ưu performance.
Mục đích: Tách các detections theo từng class để xử lý riêng biệt.
# Input: Tất cả detections sau Step 2
all_detections = [
    [100, 200, 50, 80, 0, 0.9],   # person
    [150, 220, 48, 75, 0, 0.85],  # person (trùng với detection trên)
    [500, 300, 60, 90, 1, 0.92],  # bicycle
    [120, 210, 52, 78, 0, 0.88],  # person (cũng trùng)
    [510, 305, 58, 88, 1, 0.87],  # bicycle (trùng với bicycle trên)
]

# Output: Grouped by class
class_0_detections = [  # person
    [100, 200, 50, 80, 0, 0.9],
    [150, 220, 48, 75, 0, 0.85],
    [120, 210, 52, 78, 0, 0.88],
]

class_1_detections = [  # bicycle
    [500, 300, 60, 90, 1, 0.92],
    [510, 305, 58, 88, 1, 0.87],
]
Tại sao phải group by class?
Thuật toán NMS cho 1 class:
def nms_single_class(detections, iou_threshold=0.5):
    """
    Input:
      detections = [[x1,y1,x2,y2,class,conf], ...]  # N detections
      iou_threshold = 0.5

    Output:
      kept_detections = [[x1,y1,x2,y2,class,conf], ...]  # M detections (M < N)
    """
    # Bước 1: Sắp xếp theo confidence score giảm dần
    sorted_detections = sort_by_confidence_desc(detections)

    kept_boxes = []

    # Bước 2: Loop qua từng detection
    while len(sorted_detections) > 0:
        # Lấy box có confidence cao nhất
        best_box = sorted_detections[0]
        kept_boxes.append(best_box)

        # Bước 3: Tính IoU của best_box với tất cả boxes còn lại
        remaining_boxes = []
        for box in sorted_detections[1:]:
            iou = calculate_iou(best_box, box)

            # Nếu IoU < threshold → giữ lại (không trùng)
            if iou < iou_threshold:
                remaining_boxes.append(box)
            # Nếu IoU >= threshold → loại bỏ (trùng lặp)

        sorted_detections = remaining_boxes

    return kept_boxes
Minh họa bằng ví dụ cụ thể:
# Giả sử có 4 person detections (đã sort theo conf)
person_detections = [
    [100, 200, 150, 280, 0, 0.92],  # Box A - BEST
    [105, 205, 155, 285, 0, 0.88],  # Box B - overlap với A
    [110, 202, 152, 282, 0, 0.85],  # Box C - overlap với A
    [400, 300, 450, 400, 0, 0.80],  # Box D - person khác
]

# Iteration 1:
# - Chọn Box A (conf=0.92) → KEEP
# - Tính IoU(A, B) = 0.85 > 0.5 → REMOVE B
# - Tính IoU(A, C) = 0.78 > 0.5 → REMOVE C
# - Tính IoU(A, D) = 0.02 < 0.5 → KEEP D
# Remaining: [Box D]

# Iteration 2:
# - Chọn Box D (conf=0.80) → KEEP
# Remaining: []

# Final result:
kept_boxes = [
    [100, 200, 150, 280, 0, 0.92],  # Box A
    [400, 300, 450, 400, 0, 0.80],  # Box D
]
Flowchart của NMS:
START
  ↓
Sort boxes by confidence (desc)
  ↓
Pick highest confidence box → ADD to output
  ↓
Calculate IoU with all remaining boxes
  ↓
Remove boxes with IoU > threshold
  ↓
Any boxes left?
  ├─ YES → Go back to "Pick highest"
  └─ NO → END
# Kết hợp kết quả từ tất cả các classes
final_detections = []

for class_id in range(num_classes):
    class_detections = group_by_class[class_id]
    kept_detections = nms_single_class(class_detections, iou_threshold=0.5)
    final_detections.extend(kept_detections)

# final_detections chính là output cuối cùng!
| Class-Aware NMS | Class-Agnostic NMS | |
|---|---|---|
| Cách hoạt động | Chạy NMS riêng cho từng class | Chạy NMS trên TẤT CẢ boxes cùng lúc |
| Ưu điểm | Không loại nhầm objects khác class | Nhanh hơn, đơn giản hơn |
| Nhược điểm | Chậm hơn khi có nhiều classes | Có thể loại nhầm overlapping objects |
| Use case | YOLO standard, crowded scenes | Real-time apps, single/few classes |
Ví dụ so sánh:
# Scenario: Person đứng cạnh bicycle, 2 boxes overlap 60%
person_box = [100, 200, 150, 300, 0, 0.9]   # class 0: person
bicycle_box = [120, 210, 180, 310, 1, 0.85] # class 1: bicycle

# Class-Aware NMS:
# → Xử lý riêng person và bicycle
# → GIỮ CẢ 2 BOXES ✅

# Class-Agnostic NMS:
# → Xử lý chung tất cả
# → IoU = 0.6 > threshold
# → Chỉ giữ person_box (conf cao hơn) ❌ SAI!
Kết luận: Class-Aware NMS tốt hơn cho general object detection.
# Import thư viện cần thiết
import numpy as np
import matplotlib.pyplot as plt
import cv2
from ultralytics import YOLO
import onnxruntime as ort

# Load ONNX model
model = ort.InferenceSession(
    "./yolov8n.onnx",
    providers=["CPUExecutionProvider"]
)

# Kiểm tra input/output shape
inputs = model.get_inputs()
outputs = model.get_outputs()

print("=" * 50)
print("MODEL INFORMATION")
print("=" * 50)
print(f"Input Name:  {inputs[0].name}")
print(f"Input Type:  {inputs[0].type}")
print(f"Input Shape: {inputs[0].shape}")
print("-" * 50)
print(f"Output Name:  {outputs[0].name}")
print(f"Output Type:  {outputs[0].type}")
print(f"Output Shape: {outputs[0].shape}")
print("=" * 50)
Expected Output:
==================================================
MODEL INFORMATION
==================================================
Input Name:  images
Input Type:  tensor(float)
Input Shape: [1, 3, 640, 640]
--------------------------------------------------
Output Name:  output0
Output Type:  tensor(float)
Output Shape: [1, 84, 8400]
==================================================
def preprocess_image(image_path, target_size=640):
    """
    Tiền xử lý ảnh cho YOLO model

    Args:
        image_path: Đường dẫn đến ảnh
        target_size: Kích thước input của model (mặc định 640)

    Returns:
        original_image: Ảnh gốc (BGR format)
        preprocessed_image: Ảnh đã xử lý (shape: 1, 3, 640, 640)
    """
    # Đọc ảnh
    image = cv2.imread(image_path)
    original_image = image.copy()

    print(f"📷 Original image shape: {image.shape}")

    # Convert BGR → RGB
    rgb_image = cv2.cvtColor(image, cv2.COLOR_BGR2RGB)

    # Resize về 640x640
    resized_image = cv2.resize(rgb_image, (target_size, target_size))

    # Normalize [0, 255] → [0, 1]
    normalized_image = resized_image.astype("float32") / 255.0

    # Transpose (H, W, C) → (C, H, W)
    transposed_image = normalized_image.transpose(2, 0, 1)

    # Add batch dimension (C, H, W) → (1, C, H, W)
    preprocessed_image = transposed_image[np.newaxis, ...]

    print(f"🔧 Preprocessed shape: {preprocessed_image.shape}")

    return original_image, preprocessed_image

# Test preprocessing
original_img, preprocessed_img = preprocess_image("./demo.jpg")
# Chạy model inference
predictions = model.run(
    ["output0"],  # output names
    {"images": preprocessed_img}  # input dict
)[0]

print(f"🎯 Raw prediction shape: {predictions.shape}")
# Output: (1, 84, 8400)

# Transpose để dễ xử lý
predictions = predictions.transpose(0, 2, 1)[0]
print(f"🔄 Transposed shape: {predictions.shape}")
# Output: (8400, 84)
def parse_predictions(
    predictions,
    img_width,
    img_height,
    conf_threshold=0.5,
    model_input_size=640
):
    """
    Parse YOLO predictions và filter theo confidence threshold

    Args:
        predictions: Array shape (8400, 84) từ YOLO model
        img_width: Chiều rộng ảnh gốc
        img_height: Chiều cao ảnh gốc
        conf_threshold: Ngưỡng confidence tối thiểu (default: 0.5)
        model_input_size: Kích thước input model (default: 640)

    Returns:
        filtered_boxes: Array shape (N, 6) với format:
                       [x1, y1, x2, y2, class_id, confidence]
    """
    # Step 1: Tính max confidence score cho mỗi detection
    # predictions[:, 4:] lấy 80 class scores
    max_conf_scores = np.max(predictions[:, 4:], axis=1)

    # Step 2: Lọc detections có conf > threshold
    valid_indices = np.where(max_conf_scores > conf_threshold)[0]

    if len(valid_indices) == 0:
        print("⚠️  No detections above confidence threshold!")
        return np.array([])

    # Lấy các detections hợp lệ
    valid_detections = predictions[valid_indices]

    print(f"✅ Filtered: {len(valid_detections)}/{len(predictions)} detections")

    # Step 3: Extract class_id và confidence
    class_ids = valid_detections[:, 4:].argmax(axis=1)
    confidences = valid_detections[:, 4:].max(axis=1)

    # Step 4: Convert từ center format → corner format
    # YOLO output: [x_center, y_center, width, height] (normalized 0-1)
    # Cần convert sang: [x1, y1, x2, y2] (pixel coordinates)

    x_centers = valid_detections[:, 0]
    y_centers = valid_detections[:, 1]
    widths = valid_detections[:, 2]
    heights = valid_detections[:, 3]

    # Rescale về tọa độ ảnh gốc
    scale_x = img_width / model_input_size
    scale_y = img_height / model_input_size

    x1 = ((x_centers - widths / 2) / model_input_size) * img_width
    y1 = ((y_centers - heights / 2) / model_input_size) * img_height
    x2 = ((x_centers + widths / 2) / model_input_size) * img_width
    y2 = ((y_centers + heights / 2) / model_input_size) * img_height

    # Clip coordinates về giới hạn ảnh
    x1 = np.clip(x1, 0, img_width)
    y1 = np.clip(y1, 0, img_height)
    x2 = np.clip(x2, 0, img_width)
    y2 = np.clip(y2, 0, img_height)

    # Combine tất cả thông tin
    filtered_boxes = np.hstack([
        x1[:, np.newaxis],
        y1[:, np.newaxis],
        x2[:, np.newaxis],
        y2[:, np.newaxis],
        class_ids[:, np.newaxis],
        confidences[:, np.newaxis]
    ])

    return filtered_boxes
def nms_single_class(boxes, scores, iou_threshold=0.5):
    """
    Apply Non-Maximum Suppression cho 1 class

    Args:
        boxes: Array shape (N, 4) với format [x1, y1, x2, y2]
        scores: Array shape (N,) - confidence scores
        iou_threshold: Ngưỡng IoU để loại bỏ boxes trùng lặp

    Returns:
        keep_indices: Array indices của các boxes được giữ lại
    """
    if len(boxes) == 0:
        return np.array([], dtype=np.int32)

    # Extract coordinates
    x1 = boxes[:, 0]
    y1 = boxes[:, 1]
    x2 = boxes[:, 2]
    y2 = boxes[:, 3]

    # Tính diện tích mỗi box
    areas = (x2 - x1 + 1) * (y2 - y1 + 1)

    # Sort indices theo confidence score giảm dần
    order = scores.argsort()[::-1]

    keep = []

    while order.size > 0:
        # Lấy index của box có confidence cao nhất
        i = order[0]
        keep.append(i)

        # Nếu chỉ còn 1 box → kết thúc
        if order.size == 1:
            break

        # Tính IoU của box hiện tại với tất cả boxes còn lại
        # Tìm tọa độ vùng giao
        xx1 = np.maximum(x1[i], x1[order[1:]])
        yy1 = np.maximum(y1[i], y1[order[1:]])
        xx2 = np.minimum(x2[i], x2[order[1:]])
        yy2 = np.minimum(y2[i], y2[order[1:]])

        # Tính width và height của vùng giao
        w = np.maximum(0.0, xx2 - xx1 + 1)
        h = np.maximum(0.0, yy2 - yy1 + 1)

        # Tính diện tích giao
        intersection = w * h

        # Tính IoU
        iou = intersection / (areas[i] + areas[order[1:]] - intersection)

        # Giữ lại các boxes có IoU <= threshold (không trùng)
        inds = np.where(iou <= iou_threshold)[0]

        # Update order (cộng 1 vì đã bỏ qua phần tử đầu)
        order = order[inds + 1]

    return np.array(keep, dtype=np.int32)
def apply_nms(filtered_boxes, iou_threshold=0.5):
    """
    Apply Class-Aware NMS trên tất cả detections

    Args:
        filtered_boxes: Array shape (N, 6)
                       [x1, y1, x2, y2, class_id, confidence]
        iou_threshold: Ngưỡng IoU (default: 0.5)

    Returns:
        final_boxes: Array các boxes sau NMS
    """
    if len(filtered_boxes) == 0:
        return np.array([])

    # Step 3: Lấy danh sách unique classes
    unique_classes = np.unique(filtered_boxes[:, 4])

    print(f"\n🎨 Detected classes: {unique_classes.astype(int)}")

    final_indices = []

    # Step 4: Loop qua từng class và apply NMS
    for class_id in unique_classes:
        # Lấy indices của class này
        class_indices = np.where(filtered_boxes[:, 4] == class_id)[0]
        class_boxes = filtered_boxes[class_indices, :4]  # x1,y1,x2,y2
        class_scores = filtered_boxes[class_indices, 5]  # confidence

        print(f"  Class {int(class_id)}: {len(class_boxes)} boxes before NMS")

        # Apply NMS cho class này
        keep_indices = nms_single_class(
            class_boxes,
            class_scores,
            iou_threshold
        )

        # Chuyển về indices global
        global_keep_indices = class_indices[keep_indices]
        final_indices.extend(global_keep_indices)

        print(f"  Class {int(class_id)}: {len(keep_indices)} boxes after NMS ✓")

    # Step 5: Combine results
    final_boxes = filtered_boxes[final_indices]

    print(f"\n📦 Final detections: {len(final_boxes)}")

    return final_boxes
# COCO class names (80 classes)
COCO_CLASSES = [
    "person", "bicycle", "car", "motorcycle", "airplane", "bus", "train",
    "truck", "boat", "traffic light", "fire hydrant", "stop sign",
    "parking meter", "bench", "bird", "cat", "dog", "horse", "sheep", "cow",
    "elephant", "bear", "zebra", "giraffe", "backpack", "umbrella",
    "handbag", "tie", "suitcase", "frisbee", "skis", "snowboard",
    "sports ball", "kite", "baseball bat", "baseball glove", "skateboard",
    "surfboard", "tennis racket", "bottle", "wine glass", "cup", "fork",
    "knife", "spoon", "bowl", "banana", "apple", "sandwich", "orange",
    "broccoli", "carrot", "hot dog", "pizza", "donut", "cake", "chair",
    "couch", "potted plant", "bed", "dining table", "toilet", "tv",
    "laptop", "mouse", "remote", "keyboard", "cell phone", "microwave",
    "oven", "toaster", "sink", "refrigerator", "book", "clock", "vase",
    "scissors", "teddy bear", "hair drier", "toothbrush"
]

def yolo_postprocess_complete(
    image_path,
    model,
    conf_threshold=0.5,
    iou_threshold=0.5
):
    """
    Complete YOLO post-processing pipeline

    Args:
        image_path: Đường dẫn ảnh
        model: ONNX model session
        conf_threshold: Confidence threshold
        iou_threshold: IoU threshold for NMS

    Returns:
        final_detections: Array các detections cuối cùng
        original_image: Ảnh gốc để visualize
    """
    print("\n" + "="*60)
    print("YOLO POST-PROCESSING PIPELINE")
    print("="*60)

    # 1. Preprocess
    print("\n[1/5] Preprocessing image...")
    original_image, preprocessed_image = preprocess_image(image_path)
    img_height, img_width = original_image.shape[:2]

    # 2. Inference
    print("\n[2/5] Running model inference...")
    predictions = model.run(
        ["output0"],
        {"images": preprocessed_image}
    )[0]
    predictions = predictions.transpose(0, 2, 1)[0]  # (8400, 84)

    # 3. Parse & Filter
    print(f"\n[3/5] Parsing predictions (conf > {conf_threshold})...")
    filtered_boxes = parse_predictions(
        predictions,
        img_width,
        img_height,
        conf_threshold=conf_threshold
    )

    if len(filtered_boxes) == 0:
        print("\n❌ No detections found!")
        return np.array([]), original_image

    # 4. Apply NMS
    print(f"\n[4/5] Applying NMS (IoU threshold: {iou_threshold})...")
    final_detections = apply_nms(filtered_boxes, iou_threshold=iou_threshold)

    # 5. Print results
    print("\n[5/5] Final Results:")
    print("="*60)
    for det in final_detections:
        x1, y1, x2, y2, class_id, conf = det
        class_name = COCO_CLASSES[int(class_id)]
        print(f"  📍 {class_name:15s} | Conf: {conf:.3f} | "
              f"Box: [{int(x1)}, {int(y1)}, {int(x2)}, {int(y2)}]")
    print("="*60)

    return final_detections, original_image

# Run complete pipeline
final_dets, orig_img = yolo_postprocess_complete(
    image_path="./demo.jpg",
    model=model,
    conf_threshold=0.5,
    iou_threshold=0.5
)
def visualize_detections(image, detections, class_names=COCO_CLASSES):
    """
    Vẽ bounding boxes và labels lên ảnh

    Args:
        image: Ảnh gốc (BGR format)
        detections: Array shape (N, 6)
        class_names: List tên các classes
    """
    # Copy ảnh để không modify original
    vis_image = image.copy()

    # Generate colors cho mỗi class
    np.random.seed(42)
    colors = np.random.randint(0, 255, size=(len(class_names), 3))

    for det in detections:
        x1, y1, x2, y2, class_id, conf = det
        class_id = int(class_id)

        # Get color và class name
        color = colors[class_id].tolist()
        class_name = class_names[class_id]

        # Vẽ bounding box
        cv2.rectangle(
            vis_image,
            (int(x1), int(y1)),
            (int(x2), int(y2)),
            color,
            thickness=2
        )

        # Tạo label text
        label = f"{class_name} {conf:.2f}"

        # Tính kích thước text
        (text_width, text_height), _ = cv2.getTextSize(
            label,
            cv2.FONT_HERSHEY_SIMPLEX,
            0.6,
            1
        )

        # Vẽ background cho text
        cv2.rectangle(
            vis_image,
            (int(x1), int(y1) - text_height - 10),
            (int(x1) + text_width, int(y1)),
            color,
            -1
        )

        # Vẽ text
        cv2.putText(
            vis_image,
            label,
            (int(x1), int(y1) - 5),
            cv2.FONT_HERSHEY_SIMPLEX,
            0.6,
            (255, 255, 255),
            thickness=2
        )

    return vis_image

# Visualize kết quả
result_image = visualize_detections(orig_img, final_dets)

# Display
plt.figure(figsize=(12, 8))
plt.imshow(cv2.cvtColor(result_image, cv2.COLOR_BGR2RGB))
plt.axis('off')
plt.title('YOLO Detection Results After NMS', fontsize=16)
plt.tight_layout()
plt.savefig('detection_result.png', dpi=150, bbox_inches='tight')
plt.show()

print("✅ Saved result to 'detection_result.png'")
import time

def benchmark_nms(image_path, model, num_runs=10):
    """
    Đo performance của NMS pipeline
    """
    print(f"\n⏱️  Running benchmark ({num_runs} iterations)...")

    times = {
        'preprocess': [],
        'inference': [],
        'postprocess': [],
        'total': []
    }

    for i in range(num_runs):
        t_total_start = time.time()

        # Preprocess
        t1 = time.time()
        orig_img, prep_img = preprocess_image(image_path)
        t2 = time.time()
        times['preprocess'].append(t2 - t1)

        # Inference
        t1 = time.time()
        pred = model.run(["output0"], {"images": prep_img})[0]
        pred = pred.transpose(0, 2, 1)[0]
        t2 = time.time()
        times['inference'].append(t2 - t1)

        # Postprocess
        t1 = time.time()
        filtered = parse_predictions(pred, orig_img.shape[1], orig_img.shape[0])
        final = apply_nms(filtered)
        t2 = time.time()
        times['postprocess'].append(t2 - t1)

        times['total'].append(time.time() - t_total_start)

    # Print results
    print("\n" + "="*60)
    print("PERFORMANCE BENCHMARK RESULTS")
    print("="*60)
    for stage, stage_times in times.items():
        avg = np.mean(stage_times) * 1000
        std = np.std(stage_times) * 1000
        print(f"{stage:15s}: {avg:6.2f} ± {std:5.2f} ms")
    print("="*60)

    total_avg = np.mean(times['total']) * 1000
    fps = 1000 / total_avg
    print(f"Average FPS: {fps:.1f}")
    print("="*60)

# Run benchmark
benchmark_nms("./demo.jpg", model, num_runs=10)
| Use Case | Recommended conf_threshold |
Lý do |
|---|---|---|
| General purpose | 0.5 - 0.6 | Cân bằng precision/recall |
| High precision needed | 0.7 - 0.8 | Giảm false positives |
| High recall needed | 0.3 - 0.4 | Detect nhiều objects, chấp nhận FP |
| Real-time application | 0.6 - 0.7 | Giảm số boxes cần xử lý → nhanh hơn |
Cách tuning:
# Test với nhiều thresholds
thresholds = [0.3, 0.4, 0.5, 0.6, 0.7]
for thresh in thresholds:
    dets, _ = yolo_postprocess_complete(
        "test.jpg", model,
        conf_threshold=thresh
    )
    print(f"Threshold {thresh}: {len(dets)} detections")
| Scenario | Recommended iou_threshold |
Ví dụ |
|---|---|---|
| Crowded scenes | 0.3 - 0.4 | Crowd counting, traffic |
| Normal scenes | 0.5 - 0.6 | General detection |
| Sparse objects | 0.6 - 0.7 | Large objects, few overlaps |
Rule of thumb:
# ❌ BAD: Loop từng box
def slow_nms(boxes, scores, iou_thresh):
    keep = []
    for i in range(len(boxes)):
        if i in removed:
            continue
        for j in range(i+1, len(boxes)):
            iou = calculate_iou(boxes[i], boxes[j])
            if iou > iou_thresh:
                removed.add(j)
    return keep

# ✅ GOOD: Vectorized operations
def fast_nms(boxes, scores, iou_thresh):
    # Tính tất cả IoUs cùng lúc
    ious = calculate_iou_matrix(boxes)  # vectorized
    # ... rest of NMS logic
Performance gain: ~10-50x faster!
# Nếu số detections quá nhiều → tăng conf_threshold
if len(filtered_boxes) > 1000:
    print("⚠️ Too many detections, increase conf_threshold!")
    filtered_boxes = filtered_boxes[filtered_boxes[:, 5] > 0.7]
# ❌ SAI: Giữ nguyên tọa độ normalized
x1 = (x_center - width/2)  # sẽ ra giá trị 0-1

# ✅ ĐÚNG: Rescale về pixel coordinates
x1 = ((x_center - width/2) / 640) * img_width
# ❌ SAI: NMS chung cho tất cả classes
all_boxes = combine_all_classes(detections)
keep = nms(all_boxes)  # Có thể loại nhầm!

# ✅ ĐÚNG: NMS riêng cho từng class
for class_id in unique_classes:
    class_boxes = filter_by_class(detections, class_id)
    keep = nms(class_boxes)
# ❌ SAI: Coordinates có thể âm hoặc vượt quá ảnh
x1, y1, x2, y2 = convert_coords(...)

# ✅ ĐÚNG: Clip về giới hạn ảnh
x1 = np.clip(x1, 0, img_width)
y1 = np.clip(y1, 0, img_height)
x2 = np.clip(x2, 0, img_width)
y2 = np.clip(y2, 0, img_height)
# Visualize intermediate results
def debug_nms(image, detections, stage_name):
    """Vẽ detections ở mỗi stage"""
    vis = visualize_detections(image, detections)
    cv2.imwrite(f"debug_{stage_name}.jpg", vis)
    print(f"💾 Saved {stage_name}: {len(detections)} boxes")

# Usage
filtered = parse_predictions(...)
debug_nms(image, filtered, "after_filtering")

final = apply_nms(filtered)
debug_nms(image, final, "after_nms")
A: Vì Ultralytics đã apply NMS với default settings (conf=0.25, iou=0.45). Khi bạn convert, bạn nhận raw output chưa qua NMS.
# Ultralytics internals (hidden from user)
results = model.predict("image.jpg")
# ↑ Đã apply NMS inside

# ONNX (raw output)
raw_output = onnx_model.run(...)
# ↑ Chưa apply NMS, bạn phải tự làm
A: Có, nhưng không đáng kể trong most cases:
# Benchmark results (10,000 detections, 80 classes)
Class-Agnostic NMS: ~15ms
Class-Aware NMS:    ~25ms
# Chỉ chậm hơn ~10ms, acceptable!
Trade-off này đáng giá vì accuracy cao hơn nhiều.
Tips:
conf_threshold: 0.3 - 0.4 thay vì 0.5iou_threshold: 0.4 thay vì 0.5# Multi-scale inference
scales = [640, 800, 1024]
all_detections = []
for scale in scales:
dets = inference(image, scale)
all_detections.extend(dets)
final = apply_nms(all_detections)
A: Có! Soft-NMS giảm score thay vì loại bỏ hoàn toàn.
def soft_nms(boxes, scores, iou_thresh=0.5, sigma=0.5):
    """
    Soft-NMS: Giảm score thay vì remove
    """
    for i in range(len(boxes)):
        max_idx = scores.argmax()

        # Tính IoU
        ious = calculate_iou(boxes[max_idx], boxes)

        # Decay scores thay vì remove
        decay = np.exp(-(ious ** 2) / sigma)
        scores = scores * decay
        scores[max_idx] = -1  # Đã xử lý

    return keep_indices
Soft-NMS tốt hơn cho:
A: Có! Phụ thuộc vào kiến trúc:
| Model | Input Size | Output Shape | Số Detections |
|---|---|---|---|
| YOLOv8n | 640 | (1, 84, 8400) | 8,400 |
| YOLOv8n | 1280 | (1, 84, 33600) | 33,600 |
| YOLOv5 | 640 | (1, 25200, 85) | 25,200 |
Công thức: num_detections = Σ(feature_map_h × feature_map_w)
JavaScript (TensorFlow.js):
async function applyNMS(boxes, scores, iouThreshold) {
    const nmsIndices = await tf.image.nonMaxSuppressionAsync(
        boxes,
        scores,
        maxOutputSize,
        iouThreshold
    );
    return nmsIndices;
}
C++ (OpenCV):
#include <opencv2/dnn.hpp>

std::vector<int> indices;
cv::dnn::NMSBoxes(
    boxes,           // std::vector<Rect>
    confidences,     // std::vector<float>
    conf_threshold,
    iou_threshold,
    indices
);
Nguyên nhân:
Giải pháp:
# 1. Temporal smoothing
def smooth_detections(current_dets, prev_dets, alpha=0.7):
    """Smooth boxes giữa các frames"""
    smoothed = alpha * current_dets + (1 - alpha) * prev_dets
    return smoothed

# 2. Tracking
# Sử dụng tracking algorithms (DeepSORT, ByteTrack)
tracker = DeepSORT()
tracked_objects = tracker.update(detections)
Benchmarks (YOLOv8n, 640x640, CPU):
| Stage | Time | % of Total |
|---|---|---|
| Preprocessing | 2ms | 10% |
| Inference | 15ms | 70% |
| NMS | 4ms | 20% |
| Total | 21ms | 100% |
Kết luận: NMS chỉ chiếm ~20% thời gian, không phải bottleneck!
conf_threshold, iou_threshold) rất quan trọngNếu bạn có câu hỏi hoặc gặp vấn đề khi implement NMS, feel free để lại comment bên dưới! Mình sẽ cố gắng trả lời sớm nhất có thể.
Happy Coding! 🚀
Bài viết được viết bởi Le Hoang Viet
Cập nhật lần cuối: 17th Feb 2026
Cited as:
Le Hoang Viet. "Explain Non-Maximum Suppression and build it from scratch". Le Hoang Viet's Homepage, March 2024. https://mikyx-1.github.io/blog/nms-explanation.html
Or the BibTeX entry:
@misc{le2024nmsexplanation,
  title   = {Explain Non-Maximum Suppression and build it from scratch},
  author  = {Le, Hoang Viet},
  journal = {Le Hoang Viet's Homepage},
  year    = {2024},
  month   = {March},
  url     = {https://mikyx-1.github.io/blog/nms-explanation.html}
}
← Back to the blog index. Send feedback by email.